Showing posts with label Alpaca Silk Georgette. Show all posts

Monday, October 24, 2011

Jo Sharp Knit Issue 7 Ra-Ra Cape Construction part 1

My daughter really fancied the Ra-Ra Cape from Knit Issue 7.

SAM_1094_plus_logo_TR

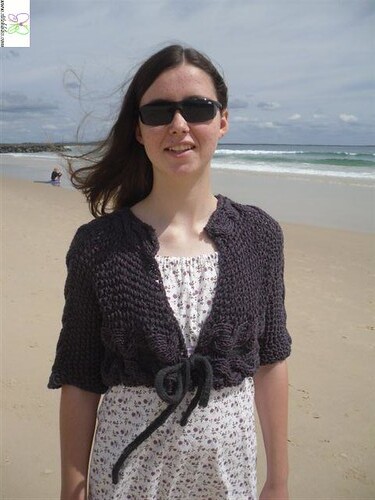
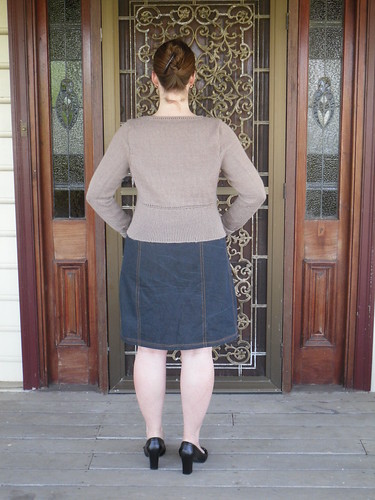
This pattern calls for 10 different balls of yarn in 5 separate pieces loosely joined by 3 i-cords. Reading through the pattern, I noted that several of these shades were only used for a relatively small amount of knitting. I decided to make a version of this pattern from mostly remnant yarn, to get an idea of the amounts needed.

SAM_1158

Section 1 and 2
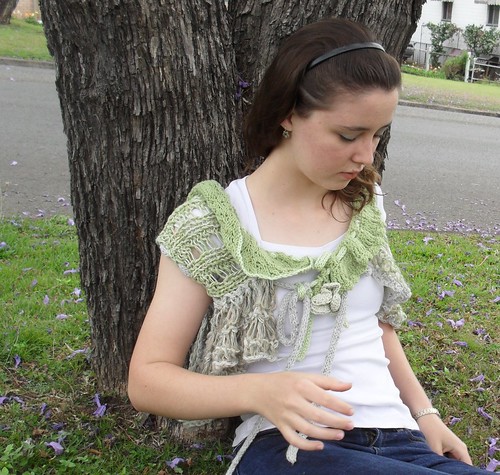
I used Alpaca Silk Georgette, Kelp, 1 ball for both sections. I used Sirdar baby bamboo, Willow to edge section 1.

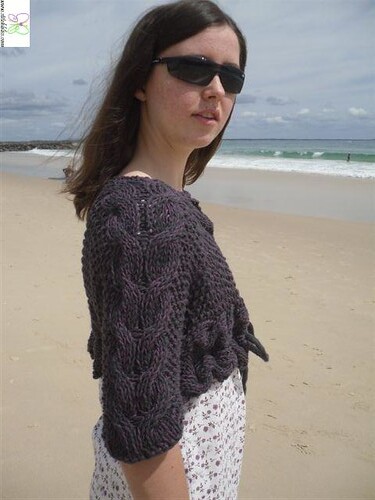
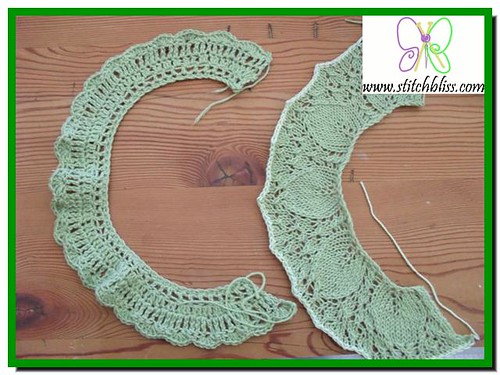
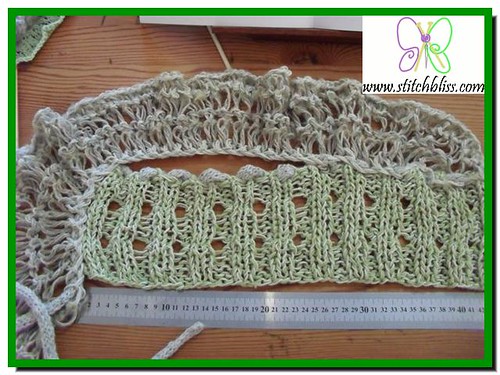
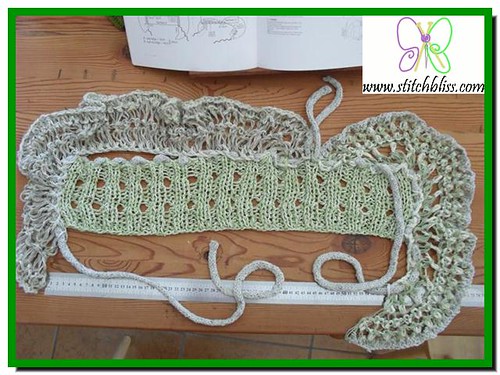
Section 1 was straightforward, and a pretty lace pattern. The pattern calls for lightly ironing this piece before assembly. Instead I dampened the piece and gently stretched it to shape, pinning the section to my ironing board to dry overnight. I feel that this displays the lace pattern to advantage, without the risk of distorting the piece by ironing.

Section 2 is simple crochet. The crochet instructions in this pattern are written in USA style. I found this a bit annoying. The pattern book is published in Australia, and it is an error, in my opinion, to publish in this country, for distribution in this country, using non-Australian terms without noting this use in the pattern.

In spite of translating from USA to Australian/British crochet terms, I found that using the ASG for the crochet ruffle rather than the mohair indicated (or maybe not having a tension gauge to aspire to) left me with a crochet ruffle far less wide than the blocked knitted lace ruffle. I added a shell edging to increase the width.

RS: 1dc,*miss 1 stitch, 5tr into next stitch, miss 1 stitch, 1dc into next stitch: rep from*

SAM_0952_plus_logo_TR

Section 3
This is the only part of the garment for which a tension is given. Using the tension gauge, this piece is 60cm in length.
There is an error in this section. The first 6 rows are correct, except for the double asterisks at the end of row 6, which should be ignored.

Rows 7 - 12 Rep rows 1 to 6.
Rows 13 - 17 Rep rows 1 to 5.
Cast off in rib pattern.

I used Alpaca Silk Georgette in Kelp, and Aslan Trends Glaciar Del Cielo, in colour Green Tea for section 3

Section 5 and 6 were constructed as written, using the same Rare Comfort Kid mohair shade for both (Damask) (C and D), with the other yarns being Silkroad DK Tweed in Magnolia (this is yarn E in the pattern, and I used it as yarn E), substituting Aslan Trends Artesenal in Champagne for yarn F, and using the Green Tea cotton (I), the Baby Bamboo Willow yarn (J) and Jo Sharp Soho Summer Cotton in Crete (H) as the three cottons.

The i- cords were made from the Baby Bamboo, in Willow, and in the Magnolia shade of the Silk Road DK tweed. The crochet flowers (translated from American again) were made in the Green Tea cotton.

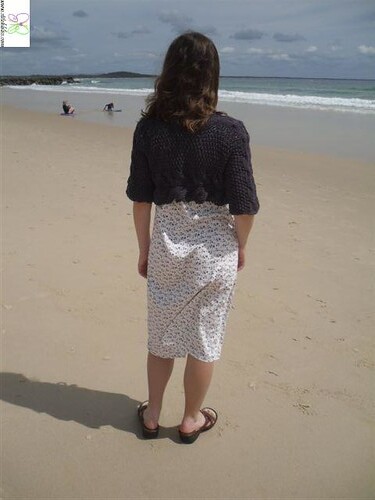
I then started the assembly. This was not straightforward, as the diagrams are not to scale.
SAM_1075_plus_logo_TR

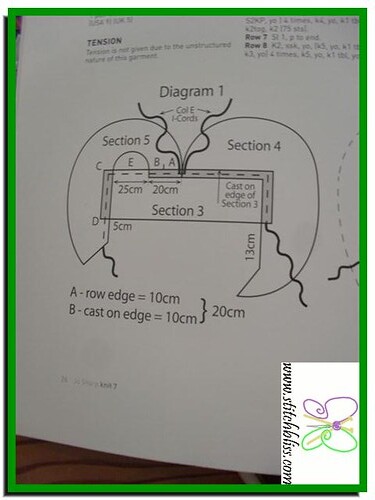
As section 3 is 60cm long, and Section 5 is attached to it for 20 cm, followed by a 25 cm gap, then attached for an unspecified length, it is important to note that Section 5 is attached at least 3/4 of the way along the length of Section 3, not 1/2 way along as Diagram 1 would indicate. (I unpicked ;( )

SAM_1074_plus_logo_TR

I found that Section 4 was slightly gathered to Section 3 to achieve the 13cm unattached edge at the left.

SAM_1092_plus_logo_TR

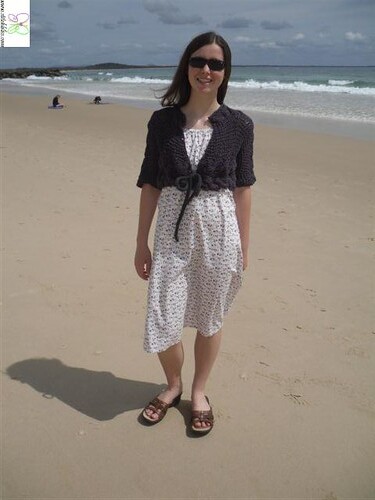
I found all the i-cords rather too long in this garment. In retrospect, I could have made them a third shorter with no problems for wear by an average sized woman.

I will write about the next assembly steps in a further post.

Friday, November 5, 2010

Knit 8 Side to side cardigan, version 2

Today I have asked Hannah to write a guest post about the cardigan she has just finished. Hannah has been knitting for 2 years, and is working in the shop part time.

Pattern description:

The pattern I used is the side to side cardigan, from Knit 8. I made Version 2.
This pattern is for a short, sideways knitted cardigan with three cables. The cardigan ties with an eye cord that runs through one of the cables.

SDC10074_plus_logo_BL


Why did you chose this pattern? Did the finished garment turn out as you expected?


I chose the cardigan pattern because it looked fun and quick to knit and had quite a few techniques that I hadn't used before. When I finished the cardigan it looked exactly like the picture in Knit 8, but with different colours and a longer i-cord, which were my changes.

SDC10064_plus_logo_BL

Did you find any errors or tricky places in the pattern?

Right at the end of the pattern there was one minor error, the knits were called purls and the purls were called knits, but I found it before I knitted that section, thank goodness. :)

SDC10063_plus_logo_BL

What yarns and needles did you use? Did you like the yarn texture and colour? Did the yarns work well for the pattern?:


For the cardigan I used Alpaca Silk Georgette 751 Pebble and Soho Summer DK Cotton 234 Currant. I used Currant instead of Soho Summer DK Cotton 216 Sapote, which is the yarn used in the pattern instructions, because I preferred the colour combination of purple and steel grey to the suggested brown and steel grey, which seemed a bit dull to me. The needles I used were 5.5mm and 10.0mm single pointed needles, a cable needle, a stitch holder and 5.5mm double pointed needles.

The two yarns together feel soft and make the pattern look slightly lacy, because they're knitted together on large needles. The two yarns worked really well for the cardigan, I love the combined colours and the yarns feel very soft. The cardigan is also a perfect weight for Queensland, it gives some warmth but isn't too hot, because of its lacy texture.

SDC10062_plus_logo_BL

How long did it take you to knit the garment:


I knitted the cardigan on and off for about 2 months, not doing much knitting each time. The actual knitting was very quick though, and sewing up barely took any time at all. Probably the most time consuming part of the cardigan was knitting the i-cord.

Was it a difficult knit for you? Did you use any new techniques?:

This wasn't a very difficult cardigan to make, the instructions were quite easy to read and follow, even though there were a few techniques I hadn't really used much before, like the moss stitch and the whole experience of knitting "sideways." The instructions for the i-cord weren't as clear but I found very user-friendly instructions for it in Knitter's Handbook by Montse Stanley

Are you happy with the garment? Where and when are you planning to wear it?

I am very happy with the cardigan, it turned out almost exactly like I thought it would, and I think it is very flattering to wear. I plan to wear the cardigan in spring, autumn and maybe on warmer winter days. So far I've worn it with a dress during a breezy day at the beach and at work over a blouse, with a skirt. I am really satisfied with the cardigan, hopefully I'll be able to wear it a lot. I think it will dress up a jeans outfit, or look smart and casual over a more formal outfit.

SDC10061_plus_logo_BL

Monday, November 1, 2010

Knit 4 sweater, Enid's version

There are few things more useful in a winter wardrobe than a classic cream jumper. Enid had a old favourite that had been worn to death, and needed to replace it. She chose the gorgeously soft and fine Alpaca Silk Georgette yarn with which to make her jumper, then spent quite some time considering the many patterns available.
Her choice was one of the jumpers from Knit 4.

SDC10072_plus_logo_BL
This pattern book has several jumper options, and several cardigan options for Alpaca Silk Georgette, Enid's is a combination of sweater version 1 and sweater version 2 - Enid has knitted a medium length for the body, and altered the neck to fall between the high and crew styles. She has also chosen to double over the rib neck, for a more robust and clean looking finish.

SAM_2509_plus_logo_BRstitchblissk4

Enid generally liked the pattern, but felt that there was a nasty error in the shoulder section. She had to increase the length of the shoulders by approximately 10 cm further than the pattern described. Fortunately, she had no difficulty with the relatively small amount of reverse knitting that was needed.

The final jumper is a great success, and will undoubtedly be loved to death, just like the first classic cream jumper. Using a fine yarn for a jumper gives a good fit without excess bulk.

SAM_2501_plus_logo_BRstitchblissk4

Monday, September 28, 2009

Knit 5, Eyelet Cardigan

I have just finished the eyelet cardigan from Jo Sharp Knit 5. Whilst I am happy with the final result, I did not have plain sailing with this pattern due to fitting issues. I have described these in greater detail in my notes on Ravelry, but I admit to a lot of reverse knitting and work with the calculator at the armhole and upper sleeve. This is why I have been knitting this since April - sometimes knitting has to rest in the bag for a few weeks and think about its bad behaviour.

I particularly like the eyelet finish at the neck and waist. I think this gives just enough detail at the back to make the cardigan interesting. The closer fit of the single rib below the waist also appeals to me.
I made a few changes to the pattern aside from the fitting. I made full length sleeves, and used the eyelet stitch pattern within the rib buttoning band instead of making buttonholes. I like the effect of this buttoning band very much. It needed a lot more buttons, as the eyelet pattern holes are small.

My favourite part of knitting this cardigan was the luscious texture of the alpaca silk georgette yarn. I used colour 750, Briar. I think the texture of the cardigan will make it a staple of my wardrobe.